Rails and tracks...
While waiting for a shipment from Rig-rite, I tackled some projects that needed attention. I traced a water leak by the nav desk to the starboard slide retention rail for the cabin top. I was 90% sure the water was getting in through one of the fastener holes, and when I removed the slide rail, sure enough, there was an extra unsealed hole that had been inadvertently drilled when the rail was last installed. I reamed out the hole and sealed it with epoxy and then got to work on refinishing the teak rail itself. It definitely needed some attention:
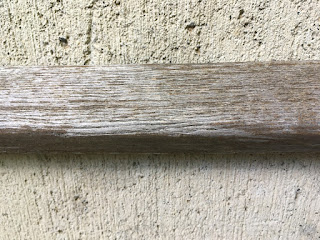


I started with a wood file, then sanded with 100 grit paper and finished with 220 grit. After wiping with mineral spirits and letting dry, I brushed on a fast drying oil-based stain, left it on for 2 minutes, and then wiped off the excess:

Normally, when you think about sealing and preserving brightwork on a boat, you traditionally think “varnish”, but I don’t want to spend a week brushing on varnish, letting it dry, sanding it and then repeating the whole process six more times. I decided to try sealing the wood with epoxy, which is a “one coat and done” operation. The advice I found indicated I should use a water-based stain, but when I stained a test piece of teak and then (after prepping), laid on a coat of epoxy, it turned out horrible; the epoxy didn’t bind in places. So, with some trepidation, I lightly sanded my newly (oil) stained teak slide rails, wiped it down with acetone, and while letting it dry, mixed up a batch of West Systems 205/105 epoxy resin. I brushed it on lightly (to minimize drips) and could tell immediately it was binding well. I was very pleased with the end result:

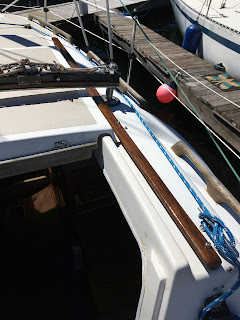
I reinstalled the rail, ensuring each fastener hole, and area around each hole had an adequate amount of marine sealant before installation. No leaks so far, and it looks so much better, but now of course I will need to do the opposite rail very soon so they match!
MAST T-TRACKS
The last rigging project I had before the first hoist of the square sail was to install T-tracks on each side of the mast. One track I removed from the front of the mast, and I ordered an identical track, along with a matching ring car that one end of the crossjack will attach to. After carefully considering WHERE on the mast to mount the tracks, I finally took the plunge and started drilling holes. After tapping the holes to accept 10-24 machine screws, I installed the track with stainless steel fasteners and added a dab of anti-seize to each screw to mitigate galvanic corrosion between the steel screws and aluminum mast. I finished it off by installing end caps for each track.


