Posts

Showing posts from June, 2020

Version 1.1 ...

Image
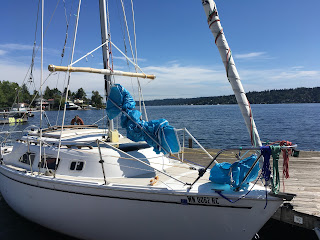
I bought a pair of the biggest, beefiest screw eyes I could find at Lowe’s and installed one in each end of the yard-spar.  This added a few inches to the length of the yard-spar; the head of the sail now spans 88” instead of 84” as before: I took her out single-handed with the upgraded yard-spar and sure enough, the profile of the head of the sail improved quite a bit: Yes, that looks much better, and the sail is more effective at capturing the wind.  Today the breeze was moderate, perhaps 5-10 knots, gusting up to 12 to 14 knots and I wanted to see if I could convert the boat from fore-and-aft rigged to square rigged in those conditions, so I actually started sailing upwind with the square sail stowed and the genoa unfurled.   It all seemed fine until the first tack, when the working sheet got hung up on the yard-spar during the maneuver; this caused a bit of chaos and some entertainment for anyone on shore watching me bumbling around trying to sort everything out, which I did eventu

Maiden voyage...

Image
The day has arrived.  It’s time to see if this wacky idea will actually work out on the water.  I specifically chose a light wind day for the first sea trial and a friend from RSC was available to come along and help out.  After yesterday’s dry run at the dock, I modified the rigging procedure; today, I followed the revised procedure and double checked that all lines ran where they wouldn’t snag or grab anything when the sail was hoisted. Here is a picture of the port side clew.  You can see the attachment of the foreguy, crossjack and sheet. Thankfully, my first mate is a competent and experienced sailor, so it didn’t take much of a crew briefing to explain the very unconventional rigging setup and the plan for the day’s short cruise.  We shoved off and motored upwind for a bit, then turned downwind and hoisted the sail.  The crossjacks can snag on the forward lifelines but that can be managed by keeping the foreguys tight until the yard-spar is halfway up the mast. When I designed th

The first hoist...

Image
Now that I have all the standing and running rigging set, and the square sail fabricated, it is time to raise the sail and see if the yard-spar, crossjacks, retention loop, running backstay, braces, sheets, foreguys, etc. all work together the way I envisioned.  I thought through the rigging procedure and made a draft in the design document, which you can find  HERE Following my draft procedure, I started rigging the square sail and got to the place where I thought the sail was ready to be hoisted: Now, the moment of truth...I started hauling on the halyard, and...oops...the sheets need to go outside ALL of the lifelines before running to the jib car.  Okay, lower back down to the stowed position and reroute the sheets.  Second attempt:  Success! Everything worked the way I imagined it would.  I was able to control the yard-spar with the braces and swing it around the mast to capture the wind at more downwind angles; control the foot of the sail with the sheets; control the crossjacks

Rails and tracks...

Image
While waiting for a shipment from Rig-rite, I tackled some projects that needed attention.  I traced a water leak by the nav desk to the starboard slide retention rail for the cabin top.  I was 90% sure the water was getting in through one of the fastener holes, and when I removed the slide rail, sure enough, there was an extra unsealed hole that had been inadvertently drilled when the rail was last installed.  I reamed out the hole and sealed it with epoxy and then got to work on refinishing the teak rail itself.  It definitely needed some attention: I started with a wood file, then sanded with 100 grit paper and finished with 220 grit.  After wiping with mineral spirits and letting dry, I brushed on a fast drying oil-based stain, left it on for 2 minutes, and then wiped off the excess: Normally, when you think about sealing and preserving brightwork on a boat, you traditionally think “varnish”, but I don’t want to spend a week brushing on varnish, letting it dry, sanding it and then

Square sail...part 2

Image
The next morning, after partaking of coffee and Advil, it was time to sew the reinforcement patches to the sail itself.  This was challenging due to both my poor sewing skills and to the fact that the sewing machine had a quite narrow throat.  I started with the head of the sail, since it had the most patches and the largest (and most difficult) patch to sew.   I rolled the sail material up which allowed me to attack each patch from both sides.  It wasn’t pretty, but once I had the head patches sewn in place, I sewed the top and bottom sail sections together (after first basting them together) and then worked on the two bottom (foot) patches which were easier.  Next it was time to reinforce each edge.  Jeff from Sailrite recommended I reinforce the top edge with some nylon rope before covering with Dacron tape, so that’s what I did: The other edges got just pre-folded Dacron tape.  It was attached first with basting tape and then sewn in place. The poor little sewing machine d

Square sail...part 1

Image
The package from Sailrite arrived: Will I be able to turn this into a functional square sail?  Let’s find out!  My neighbor was nice enough to lend me her large double car garage and sewing machine which made this whole process much easier.  The first step was to lay out the 1.5 oz rip-stock nylon and mark the dimensions.  This was challenging since I didn’t have an oversized T-square or any way to lay out a 90 degree angle.  Eventually I used a trick I learned when building foundation forms...measure across opposite corners and keep adjusting until they’re equal.  Once I double checked all the dimensions, I grabbed my new shears and cut out the sail. Next I had to cut out the reinforcement patches from both the rip-stock nylon (blue) and 4 oz Dacron (white). Normally, when you buy a kit from Sailrite, these patches are already cut for you, but they don’t have a kit for a square sail (no big surprise) so I just had to order the raw materials and guess the correct shape and